In today’s digital landscape, securing data transmission is paramount. SSL (Secure Sockets Layer) and TLS (Transport Layer Security) protocols serve as the bedrock of internet security, ensuring that data exchanged between clients and servers remains confidential and tamper-proof. This guide provides an extensive, step-by-step checklist to enable SSL and TLS on your web server.
Understanding the Basics
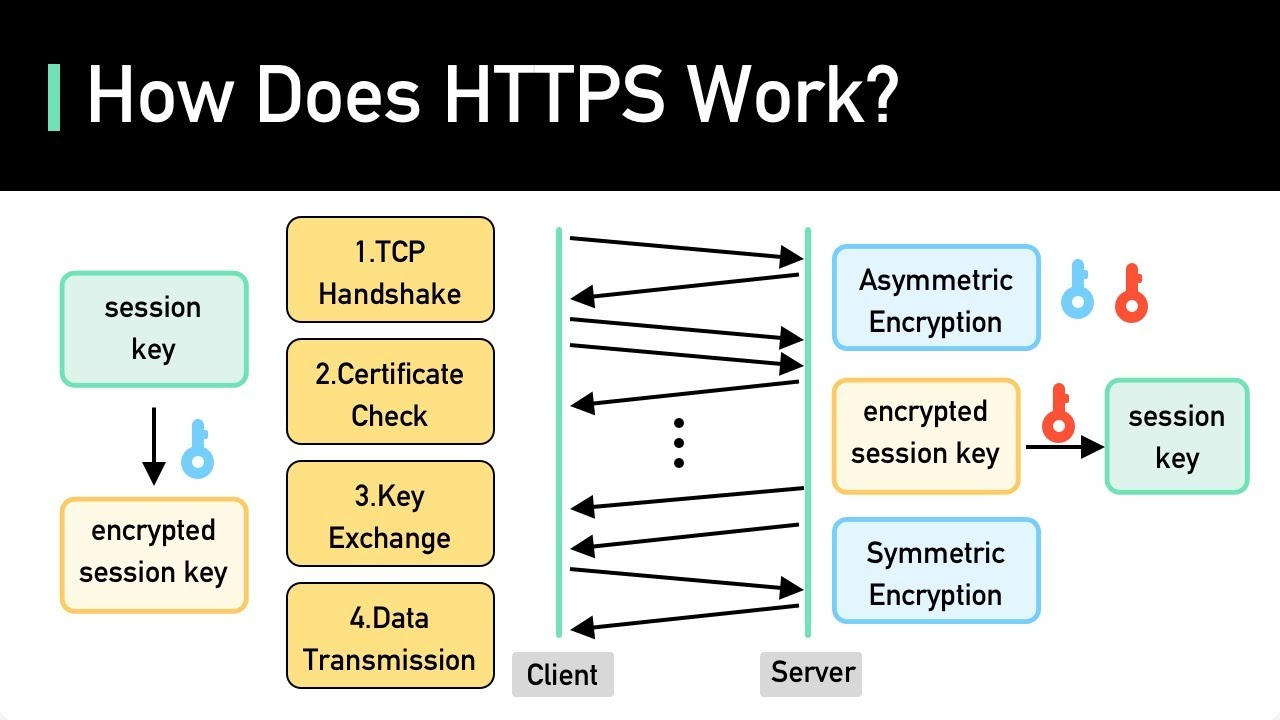
Before delving into the technical steps, it is critical to understand the significance of SSL and TLS. SSL, the predecessor to TLS, was developed to secure data sent over the internet. TLS, however, is the more contemporary and robust protocol, providing enhanced security features. Both protocols function by encrypting the data during transmission and verifying the authenticity of the communicating parties.
Step 1: Choosing an SSL/TLS Certificate
The first step in enabling SSL and TLS is procuring an SSL/TLS certificate. Various types of certificates are available, each serving distinct purposes:
- Domain Validation (DV): The most basic type, confirming ownership of the domain.
- Organization Validation (OV): More rigorous; requires verification of the business’s legitimacy.
- Extended Validation (EV): The highest level; offers substantial warranties and includes extensive vetting of the organization.
When selecting a certificate, consider factors such as the level of validation required, potential warranty offerings, and compatibility with various browsers.
Step 2: Generating a Certificate Signing Request (CSR)
- Access your server’s control panel or use command-line tools.
- Input the required details, including your domain name, organization name, and location.
- Generate the CSR, which will be used to request the SSL/TLS certificate from a Certificate Authority (CA).
Step 3: Submitting the CSR to a Certificate Authority
With the CSR generated, the next step involves submitting it to a CA. This entity will process your request, validate your details, and issue the SSL/TLS certificate. Ensure that you follow the CA’s instructions meticulously and provide any additional documentation they may require.
Step 4: Installing the SSL/TLS Certificate
Upon receiving the SSL/TLS certificate, it’s time for installation. The installation process can vary depending on your server type. Common web servers include:
- Apache: Utilize the configuration files (httpd.conf or .htaccess) to specify the path to your certificate files.
- Nginx: Edit the server block configuration to include the paths for the SSL certificate and the private key.
- IIS: Use the IIS Manager interface to import the certificate and bind it to your website.
During installation, it’s crucial to ensure that the server is configured to support both SSL and TLS protocols, with a preference for the newer TLS versions for enhanced security.
Step 5: Configuring Server Settings
Post-installation, configure your web server settings to ensure secure communications:
- Redirect HTTP to HTTPS: Implementing a 301 redirect can ensure all traffic is routed through a secure channel.
- Disable SSLv2 and SSLv3: These older protocols are vulnerable and should be disabled to protect data integrity.
- Ensure Strong Cipher Suites: Configure the server to utilize modern cipher suites that provide robust encryption.
Regularly reviewing and updating server configurations is essential as security standards evolve.
Step 6: Testing SSL/TLS Implementation
After configuration, thorough testing is imperative. Various online tools can evaluate your SSL/TLS implementation:
- SSL Labs’ SSL Test: Provides a detailed score and insights into potential vulnerabilities.
- OpenSSL: Allows you to run commands to verify the SSL/TLS certificate’s validity and configuration.
Pay attention to warnings or errors during testing, and rectify any issues promptly to maintain a secure environment.
Step 7: Regular Maintenance and Monitoring
Enabling SSL and TLS is not a one-time task. Continuous maintenance is critical:
- Regularly Update Certificates: Keep an eye on the expiration date and renew certificates in a timely manner.
- Monitor for Vulnerabilities: Stay abreast of security advisories and implement necessary patches or updates.
- Audit Server Configurations: Schedule routine audits to ensure compliance with security best practices.
By following these steps rigorously, one can establish a secure web environment that protects sensitive information from eavesdropping and tampering. The implementation of SSL/TLS is not merely a technical procedure; it represents a commitment to prioritizing user trust and data security in an ever-evolving digital era.


Leave a Comment